Getting Started
Complete these steps before building your first Autodesk Platform Services application.
Create an account
If you don't have an Autodesk account, create one at aps.autodesk.com.
- Go to aps.autodesk.com and click Sign in.
- Click Create account.
- Complete the form and verify your email.

Create a developer hub
A developer hub is where you create and manage your APS apps.
Prerequisites
- An Autodesk account (created in the previous step)
- An Autodesk team with an APS subscription (Free tier or Paid)
Most developers start with the Free tier, which provides monthly access to APS APIs with usage caps on paid APIs.
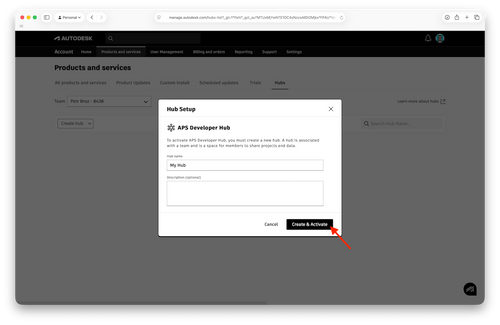
Create a developer hub
- Sign in to manage.autodesk.com.
- Click Products and Services, then click the Hubs tab.
- Click Create hub.
- Select APS Developer Hub as the product.
- Enter a hub name and optional description.
- Click Create & Activate.
- Refresh the page, then click your hub name to open the developer portal.

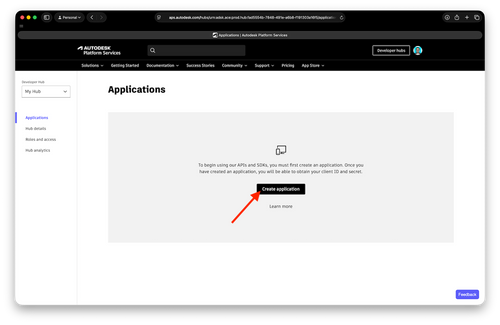
Create app credentials
To authenticate with APS APIs, you need a client ID and client secret. You get these by creating an app in your developer hub.
- In your developer hub, go to the Applications page.
- Click Create application.
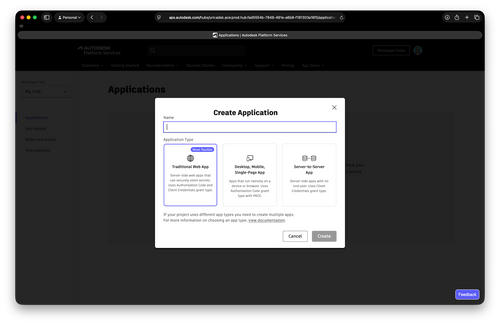
- Enter a name for your app.
- Select the application type that matches your use case:
- Traditional Web App for cases where your application runs on a server (e.g., a web app with a backend server).
- Desktop, Mobile, Single-Page App for cases where your application will run on a user's device (e.g., a mobile app, a desktop application, or a web app that runs entirely in the browser).
- Server-to-Server App for cases where your application runs on a server and does not require user authentication (e.g., backend services, daemons, or applications that access APS APIs on behalf of themselves rather than a user).
- Click Create.

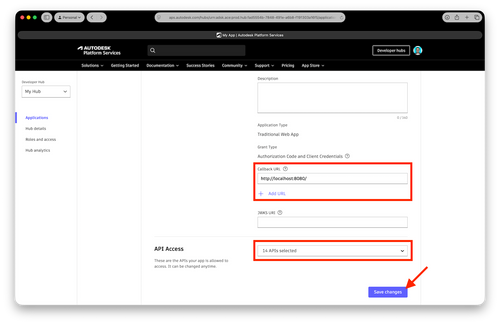
Configure your app
- In the Callback URL field, enter the URL where users will be redirected after signing in. For local development, we recommend using
http://localhost:8080/api/auth/callback. - Under API Access, select the APIs your app needs.
- Click Save changes.
The callback URL must exactly match the URL your application expects. Mismatched URLs will cause authentication to fail.
Provision access in other products
In certain cases it is possible for your application to integrate with other APS-based products such as Autodesk Forma. We leverage this capability in the Hubs Browser and Forma Administrator tutorials where you can learn about accessing designs from Forma Data Management or Fusion Teams.
However, some of these products must provision access for a specific APS application based on its client ID. Follow the steps below for any specific product you would like to integrate your application with.
If you are not planning to integrate your application with other products for now, you can skip the rest of this page and come back to it later when needed.
- Autodesk Forma
- Autodesk BIM 360
- Autodesk Fusion Team
Make sure you have admin access to an Autodesk Forma hub
- Log into your Forma hub, and navigate to Hub Admin

- From the user interface of a specific project
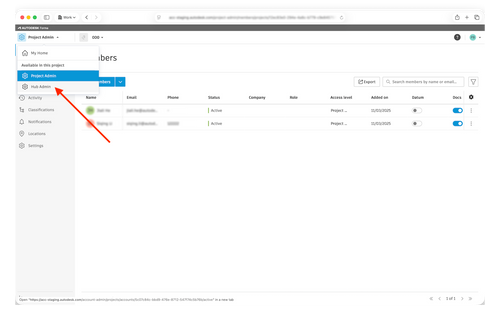
- On the Hub Admin page, go to Custom Integrations, use the Add Custom Integration button on the top to add a custom integration.

- On the Add custom integration dialog page, fill out the Client ID, Custom integration name and Description fields.
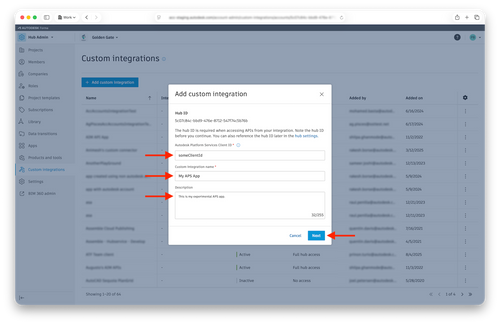
- When ready, hit the Next button
After completing the process, your application will be able to use different APS services such as Data Management API or Forma API to access information from all projects under this Forma hub.
Make sure you have admin access to a BIM 360 account.
Log into your BIM 360 account, and navigate to Account Admin
On the Account Admin page, go to Settings, and navigate to the Custom Integrations tab

Use the Add Custom Integration button on the left side to start a simple wizard that will guide you through the process
On the Select Access page, keep both the BIM 360 Account Administration and the Document Management options checked, and hit the Next button

- On the next page of the wizard, choose the I'm the developer option, and hit the Next button

Here we assume that the account admin is also the owner of the APS application. If that is not the case, the account administrator can use the Invite a developer option instead, and the invited developer will input the APS application details later.
- On the next and final page, make note of the BIM 360 Account ID, check the checkbox next to it, and fill out the Client ID and the App Name fields exactly as they appear in your application's page on https://aps.autodesk.com/myapps

Consider storing your client ID somewhere in App Description. The client ID will not appear in the custom integration after it has been created, and if the number of integrations in your account starts to grow, this will help you quickly identify the APS application each custom integration is associated with.
- When ready, scroll down and hit the Save button
And that's it. Now your application can use different APS services such as Data Management API or BIM 360 API to access information from all projects under this BIM 360 account.
No provisioning steps are needed. Your APS application can automatically access the data of your authenticated users in this product.