Project Issues
Now, we will implement our server to consume Forma Issues APIs to fetch project issues and create/modify issues.
See the video walkthrough for .NET
See the video walkthrough for Node.js
Work with Issues
We shall be utilizing Forma Issue SDK in both NodeJs and .NET samples
- Node.js & VSCode
- .NET & VSCode
- .NET & VS2022
Add the @aps_sdk/construction-issues library, and also create an instance of
SDK client of IssuesClient at the beginning of services/aps.js file:
const { SdkManagerBuilder } = require('@aps_sdk/autodesk-sdkmanager');
const { AuthenticationClient, Scopes, ResponseType } = require('@aps_sdk/authentication');
const { DataManagementClient } = require('@aps_sdk/data-management');
const { IssuesClient } = require('@aps_sdk/construction-issues');
const { APS_CLIENT_ID, APS_CLIENT_SECRET, APS_CALLBACK_URL, INTERNAL_TOKEN_SCOPES, PUBLIC_TOKEN_SCOPES } = require('../config.js');

const service = module.exports = {};

const sdk = SdkManagerBuilder.create().build();
const authenticationClient = new AuthenticationClient(sdk);
const dataManagementClient = new DataManagementClient(sdk);
const issuesClient = new IssuesClient(sdk);
Extract Issues
Next, we will add a couple of helper functions to extract issues. Append the following code to the end of the services/aps.js file.
We will extract 100 issues in one call and move to the next 100 issues until all issues are fetched.
// Forma Issues APIs
// export issues list of the project
service.getIssues = async (projectId, token) => {
    let allIssues = [];
    let offset = 0;
    let totalResults = 0;
    do {
        const resp = await issuesClient.getIssues(projectId, { accessToken: token, offset: offset });
        console.log(`Fetched ${resp.results.length} issues from offset ${offset}`);
        allIssues = allIssues.concat(resp.results);
        offset += resp.pagination.limit;
        totalResults = resp.pagination.totalResults;
    } while (offset < totalResults)
    return allIssues;
};
Create a APS.Issues.cs under the Models subfolder with the following content:
using System.Collections.Generic;
using System.Threading.Tasks;
using Autodesk.Construction.Issues;
using Autodesk.Construction.Issues.Model;
using Newtonsoft.Json.Linq;

public partial class APS
{

}
Add the following content to class APS in APS.Issues.cs file
// Forma Issues APIs
// Extract Issue Data
 public async Task<IEnumerable<dynamic>> GetIssues(string projectId, Tokens tokens)
    {
        IssuesClient issueClient = new IssuesClient(_SDKManager);
        var allIssues = new List<Issue>();
        var offset = 0;
        var totalResult = 0;
        do
        {
            var issues = await issueClient.GetIssuesAsync(projectId, accessToken: tokens.InternalToken, offset: offset);
            Console.WriteLine($"Fetched {issues.Results.Count} issues from index {offset} record.");

            allIssues.AddRange(issues.Results);
            offset += (int)issues.Pagination.Limit;
            totalResult = (int)issues.Pagination.TotalResults;

        } while (offset < totalResult);
        return allIssues;
    }
Pagination
The 'Issues' collection is managed in the APS cloud database. To ensure optimal performance, the API follows the web standard of pagination meaning each HTTP request returns only a portion of the records in the collection. With current design, Forma Issue API returns 1-100 issues in one call by default. We also have chance to specify the limit parameter which indicates how many records in one page. The other parameter offset specifies from which index of issue to extract the records. Check API reference of GET:Issues for more information.
- If the number of issue records is large, the process may take some time. In your production application, consider adding a progress bar that displays the current offset and limit, or use query parameters filter to request only specific issues from the API.
- This sample retrieves all issue data. In a real application, you can request only specific fields by using the fields query parameter.
Import Issues
Moving forward, we will add helper functions to create and modify issues. POST Issues for creating a new issue, PATCH Issues/:IssueId for modifying an existing issue. When the server receives records imported from the client (via CSV), it checks whether a record contains an ID value. If not, it creates a new issue. If an ID exists, it updates the corresponding issue with the new data.
To track status, a JSON array is logged on console with the successfully created or modified issues, along with any failed API calls and their corresponding CSV row numbers.
- Node.js & VSCode
- .NET & VSCode
- .NET & VS2022
Append the following code to the end of the services/aps.js file.
//import issues (create new issue or modify existing issue)
service.createOrModifyIssues = async (projectId, token, data) => {

    let results = {
        created: [],
        modified: [],
        failed: []
    }

    await Promise.all(
        data.map(async (oneIssueData) => {
            try {
                //remove unsupported fields and build the payload
                const { id, csvRowNum, ...payload } = oneIssueData;
                if (id == '' || id == undefined || id == null) {
                    //create new issue
                    const resp = await issuesClient.createIssue(projectId, payload, { accessToken: token });
                    results.created.push({ id: resp.id, csvRowNum: oneIssueData.csvRowNum });
                    console.log(`created issue with id ${resp.id} from csv row ${oneIssueData.csvRowNum}`);
                } else {
                    //modify an issue
                    const resp = await issuesClient.patchIssueDetails(projectId, id, payload, { accessToken: token });
                    results.modified.push({ id: resp.id, csvRowNum: oneIssueData.csvRowNum });
                    console.log(`modified issue with id ${resp.id} from csv row ${oneIssueData.csvRowNum}`);
                }

            } catch (e) {
                results.failed.push({ csvRowNum: oneIssueData.csvRowNum, reason: e.toString() });
                console.log(`failed to import issue from csv row ${oneIssueData.csvRowNum} due to ${e.toString()}`);
            }
        }));

    return results;
};
Add the following content to class APS in APS.Issues.cs file
 //create or modify issues
    public async Task<TaskRes> CreateOrModifyACCIssues(string projectId, Tokens tokens, JArray body)
    {
        IssuesClient issueClient = new IssuesClient(_SDKManager);

        var taskRes = new TaskRes()
        {
            created = new List<succeded>(),
            modified = new List<succeded>(),
            failed = new List<failed>()
        };

        foreach (JToken eachItem in body)
        {
            Issue issue = eachItem.ToObject<Issue>();

            try
            {
                //build issue payload with non-null properties only
                var issuePayload = new IssuePayload();
                var inputDataProperties = typeof(Issue).GetProperties();
                var issuePayloadProperties = typeof(IssuePayload).GetProperties();

                foreach (var property in inputDataProperties)
                {
                    var value = property.GetValue(issue);
                    if (value != null)
                    {
                        // Find the corresponding property in the IssuePayload class
                        var matchingProperty = issuePayloadProperties.FirstOrDefault(p => p.Name == property.Name && p.CanWrite);
                        if (matchingProperty != null)
                        {
                            Type propertyType = matchingProperty.PropertyType;
                            Type actualType = Nullable.GetUnderlyingType(propertyType) ?? propertyType;
                            // If the property is an enum, parse the string value to the enum type
                            if (actualType.IsEnum)
                            {
                                var enumValue = Enum.Parse(actualType, value.ToString(), true);
                                matchingProperty.SetValue(issuePayload, enumValue);
                            }
                            else
                            {
                                matchingProperty.SetValue(issuePayload, value);
                            }
                        }
                    }
                }

                if ((string)eachItem["id"] == null || (string)eachItem["id"] == "")
                {
                    //create new issue
                    Issue res = await issueClient.CreateIssueAsync(projectId, issuePayload, accessToken: tokens.InternalToken);
                    taskRes.created.Add(new succeded { id = res.Id, csvRowNum = (string)eachItem["csvRowNum"] });
                    Console.WriteLine($"Created one new issue with id: {res.Id}");
                }
                else
                {
                    //modify issue
                    Issue res = await issueClient.PatchIssueDetailsAsync(projectId, issue.Id, issuePayload, accessToken: tokens.InternalToken);
                    taskRes.modified.Add(new succeded { id = res.Id, csvRowNum = (string)eachItem["csvRowNum"] });
                    Console.WriteLine($"Modified one issue with id: {res.Id}");
                }
            }
            catch (Exception e)
            {
                taskRes.failed.Add(new failed { csvRowNum = (string)eachItem["csvRowNum"], reason = e.ToString() });
                Console.WriteLine($"Failed to create/modify issue at csv row number: {(string)eachItem["csvRowNum"]}. Error: {e.ToString()}");
            }
        }
        return taskRes;

}

 public class TaskRes
 {
     public List<succeded> created { get; set; }
     public List<succeded> modified { get; set; }
     public List<failed> failed { get; set; }
 }

 public class succeded
{
    public string id { get; set; }
    public string csvRowNum { get; set; }
}

public class failed
{
    public string csvRowNum { get; set; }
    public string reason { get; set; }
}
public static string CapitalizeFirstLetter(string input)
{
    if (string.IsNullOrEmpty(input))
    {
        return input;  // Return the input if it's null or empty
    }
    // Capitalize the first letter and make the rest lowercase
    return char.ToUpper(input[0]) + input.Substring(1).ToLower();
}
The issue creation and modification APIs only accept a limited set of fields in the request payload. This sample demonstrates how to just use some required fields from the CSV data.
- title
- description
- issueSubtypeId
- status
- dueDate
- assignedTo
- assignedToType
- rootCauseId
- published
Server endpoints
Next, let's expose the routings to extract issues and import issue to the client-side code through another set of endpoints.
- Node.js & VSCode
- .NET & VSCode
- .NET & VS2022
Next, let's expose the routings to extract and import issues to the client-side code through set of endpoints.
Create issues.js file under the routes subfolder with the following content:
const express = require('express');
var bodyParser = require('body-parser');

const { authRefreshMiddleware,
        getIssues,
        createOrModifyIssues
        } = require('../services/aps.js');

let router = express.Router();

router.use(authRefreshMiddleware);

//get issues
router.get('/api/issues/issues', async function(req, res, next){
    try {
        const issues = await getIssues(req.query.projectId,req.internalOAuthToken.access_token);
        res.json(issues);
    } catch (err) {
        next(err);
    }
});

//create new issue or modify issue
router.post('/api/issues/issues', bodyParser.json(), async function (req, res, next) {
    const projectId = req.body.projectId;
    const issues =  req.body.data;

    try {
        const importResults = await createOrModifyIssues(projectId,req.internalOAuthToken.access_token,issues);
        res.json(importResults);

    } catch (err) {
        next(err);
    }
});

module.exports = router;
And mount the router to our server application by modifying server.js:
const express = require('express');
const session = require('cookie-session');
const { PORT, SERVER_SESSION_SECRET } = require('./config.js');

let app = express();
app.use(express.static('wwwroot'));
app.use(session({ secret: SERVER_SESSION_SECRET, maxAge: 24 * 60 * 60 * 1000 }));
app.use(require('./routes/auth.js'));
app.use(require('./routes/hubs.js'));
app.use(require('./routes/issues.js'));
app.listen(PORT, () => console.log(`Server listening on port ${PORT}...`));
Create a IssuesController.cs file under the Controllers subfolder with the following content:
using System.Reflection;
using Autodesk.Construction.Issues.Model;
using Microsoft.AspNetCore.Mvc;
using Newtonsoft.Json;
using Newtonsoft.Json.Linq;
using Newtonsoft.Json.Serialization;

[ApiController]
[Route("api/[controller]")]
public class IssuesController : ControllerBase
{
    private readonly ILogger<IssuesController> _logger;
    private readonly APS _aps;

     private JsonSerializerSettings settings = new JsonSerializerSettings
    {
         ContractResolver = new ForceIncludeNullsResolver(),
         NullValueHandling = NullValueHandling.Include
    };

    public IssuesController(ILogger<IssuesController> logger, APS aps)
    {
        _logger = logger;
        _aps = aps;
    }

     [HttpGet("issues")]
    public async Task<ActionResult<string>> ListIssues(string projectId)
    {
        var tokens = await AuthController.PrepareTokens(Request, Response, _aps);
        if (tokens == null)
        {
            return Unauthorized();
        }

        var issues = await _aps.GetIssues(projectId, tokens);
        return JsonConvert.SerializeObject(issues,settings);
    }

    //create new issue or modify issue
    [HttpPost("issues")]
    public async Task<ActionResult> CreateOrModifyIssues([FromBody] JObject content)
    {
        var tokens = await AuthController.PrepareTokens(Request, Response, _aps);
        if (tokens == null)
        {
            return Unauthorized();
        }

        string projectId = content["projectId"].Value<string>();
        dynamic issues = content["data"].Value<dynamic>();

        var status = await _aps.CreateOrModifyACCIssues(projectId, tokens, issues);

        return Ok(new { created = status.created, modified = status.modified, failed = status.failed });
    }
}
    //include the fields whose value =null when  JsonConvert.SerializeObject
    public class ForceIncludeNullsResolver : DefaultContractResolver
    {
        protected override JsonProperty CreateProperty(MemberInfo member, MemberSerialization memberSerialization)
        {
            var prop = base.CreateProperty(member, memberSerialization);

            // Always include properties, even if they're null
            prop.NullValueHandling = NullValueHandling.Include;
            prop.DefaultValueHandling = DefaultValueHandling.Include;

            return prop;
        }
    }
Try it out
And that's it for the server side. Time to try it out!
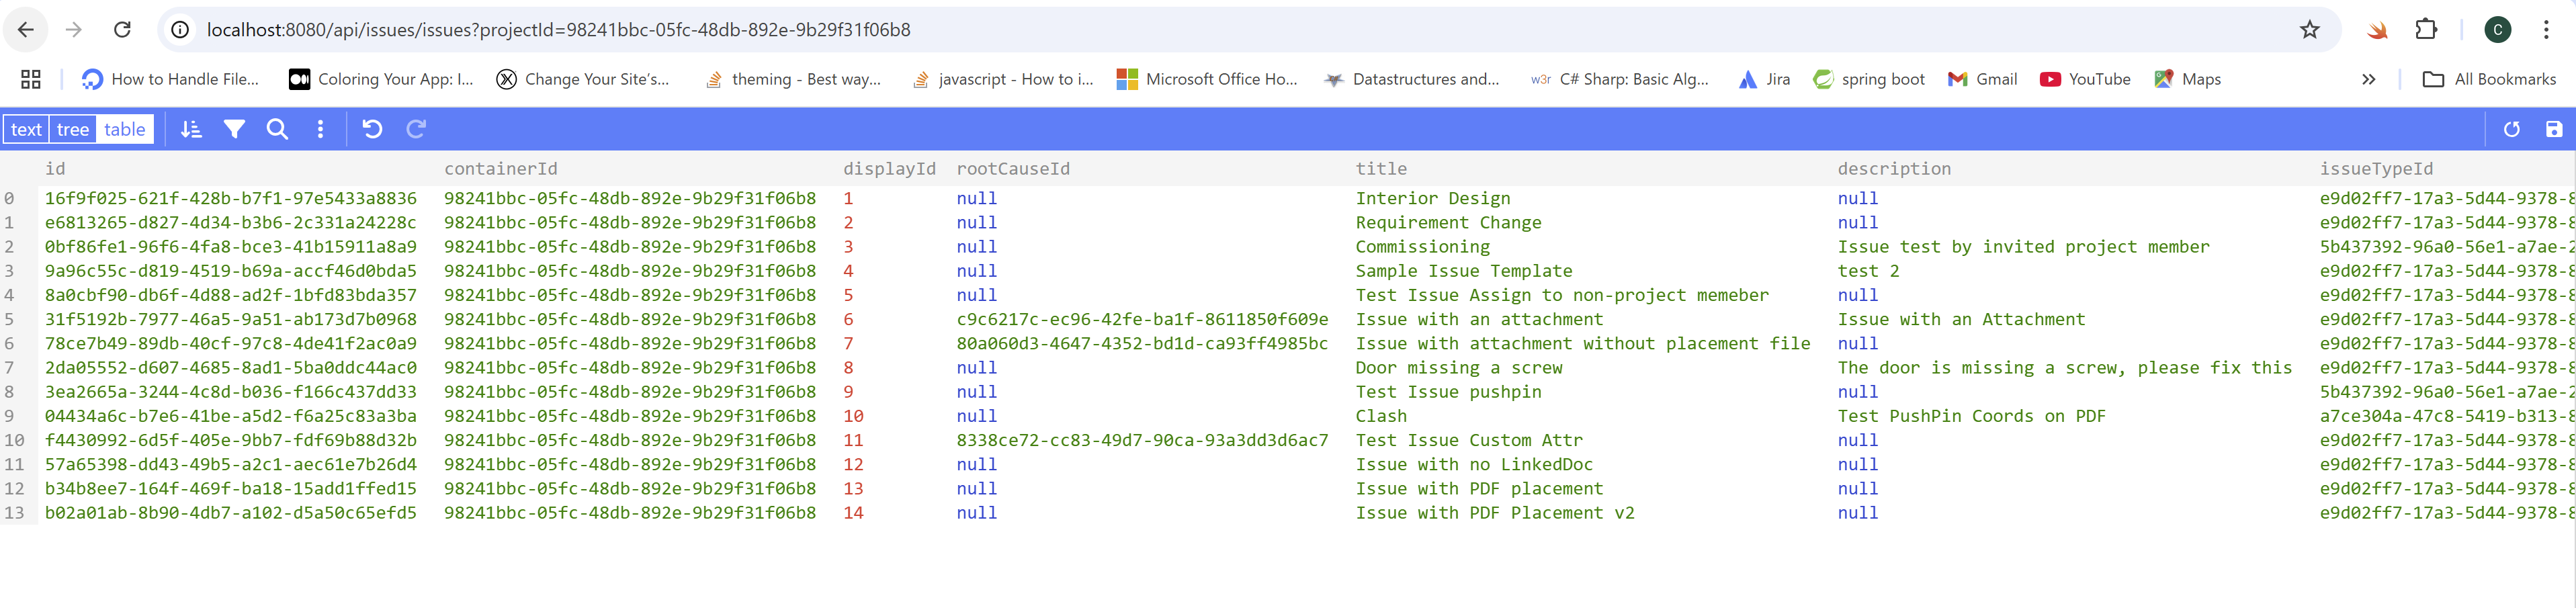
- GET Issues: Use same project ID in previous step (remove b.) and try to call the endpoint in the browser: http://localhost:8080/api/issues/issues?projectId={your-project-id}, the server application should respond with a JSON list of all the issues from this project.
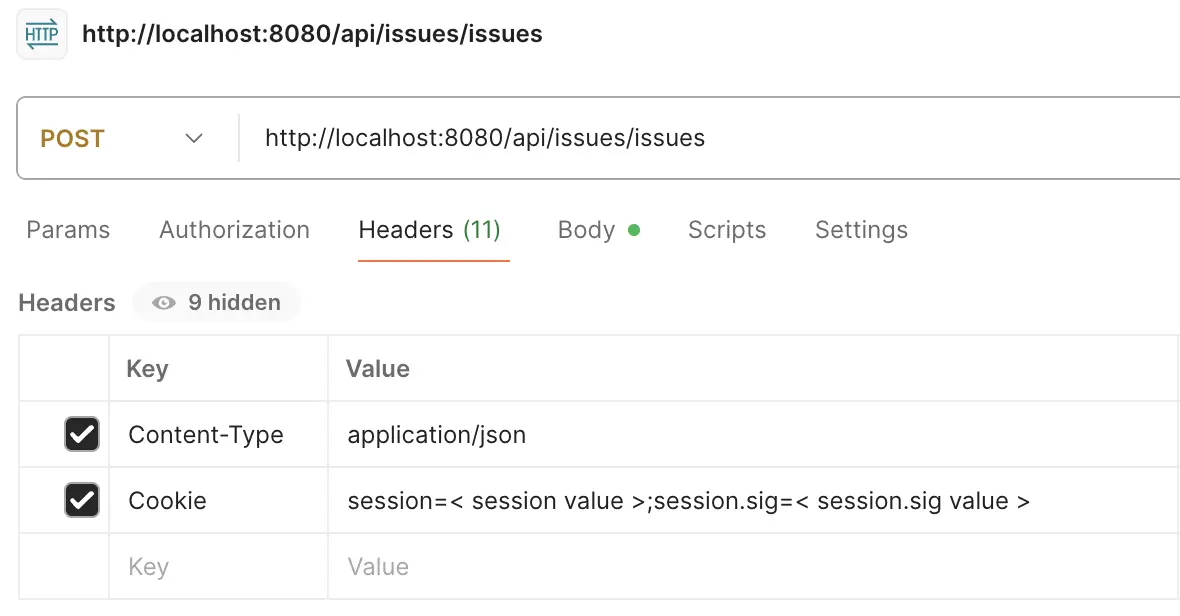
POST Issues: Browsers by default do not provide built-in tools to test endpoints that modify data, such as POST, PATCH, DELETE, etc. To test the creation or modification of issues, use other HTTP tools or command-line scripts. Below is a demo using Postman.
endpoint of this call
POST: http://localhost:8080/api/issues/issuesInput headers Content-Type and Cookie. Check Try it Out of Authentication to get Cookie value
Content-Type:application/json
NodeJS: Cookie:session=< value >;session.sig=< value >
NET: Cookie:internal_token=< value >;refresh_token=< value >;expires_at=< value>
Input request payload. If new issue, no id. The issueSubtypeId can be copied to any of the records of GET Issues. If with id, that means to update existing issue.
    {
        "projectId":"854c194f-05b3-4117-b926-69fa36c33c0c",
        "data":[
            {
                "title":"create new issue by my application",
                "issueSubtypeId":"a1637225-d69c-4afc-ad02-1c73a92ee3c1",
                "status":"open"
            },
            {
                "id": "b4f6e2f7-7bda-4e87-b139-7d94bc9c2a8d"
                "title":"modify an existing issue by my application",
                "status":"close"
            }
        ]
    }