Create Server
Your Client ID & Secret should be protected and kept confidential as all your files will be bound to your account. For a web application, keep it on your server. This section demonstrate how to prepare create a local development server.
Please review Environment Setup section for required software.
Setup Project
- Node.js & VSCode
- .NET & VSCode
- .NET & VS2022
Create a new folder for your project, navigate to it in the command line, and initialize a new Node.js project:
mkdir designAutomationSample
cd designAutomationSample
npm init -y
Next, install all the Node.js dependencies we're going to use. In this case it will be
the Express.js framework, an Express.js middleware
for handling multipart/form-data requests, and finally the APS SDK:
npm install --save express express-formidable forge-apis
The "dependencies" in your package.json file should now look something like this
(potentially with slightly different version numbers):
// ...
"dependencies": {
    "express": "^4.17.1",
    "express-formidable": "^1.2.0",
    "forge-apis": "^0.9.1"
}
// ...
- Launch Terminal or Command Prompt
- Go to the directory where you want to create the project.
- Make sure you have .NET 6 SDK installed. Refer Environment
dotnet --version
dotnet new web -n designAutomationSample
cd designAutomationSample
dotnet add package Autodesk.Forge --version 1.9.7
dotnet add package Autodesk.Forge.DesignAutomation --version 5.1.0
dotnet add package Microsoft.AspNetCore.Mvc.NewtonsoftJson --version 6.0.11
dotnet add package Microsoft.AspNetCore.Mvc.NewtonsoftJson --version 6.0.11
dotnet add package Microsoft.AspNetCore.SignalR.Protocols.NewtonsoftJson --version 6.0.11
dotnet build
code .
Create a batch/bash file and copy above dotnet statements to run in one go.
- Launch Visual Studio 2022, select
Create New Project - Enter
ASP.NET Core Emptyin templates search bar. Select and Next. - On the next dialog, let's name it
designAutomationSample, Next. - On the next dialog, ensure .NET 6.0 (Long Term Support) is selected, uncheck
Configure for HTTPS. - Disable use of top level-statements by checking the
Do not use top-level statementsbox, then clickcreate. - Install the Autodesk Forge NuGet package: right-click on the project (Solution Explorer), select Manage NuGet Package, then on Browse search for Autodesk.Forge and install Autodesk.Forge. This will be used to upload input and output results to OSS buckets.
- Please also install .NET 6 compatiable version of the following packages:
At the writing of this documentation, the tutorial is using the specified version next to the package name.
Autodesk.Forge v1.9.7
Autodesk.Forge.DesignAutomation v5.1.1
Microsoft.AspNetCore.Mvc.NewtonsoftJson v6.0.16
Microsoft.AspNetCore.SignalR.Protocols.NewtonsoftJson v6.0.16
Application Config
- Node.js & VSCode
- .NET & VSCode
- .NET & VS2022
Install packages
By default, a Node.js project is empty, so we need to install a few packages with npm install. Let's start with a basic express server, body-parser for JSON handling, multer for file upload and, of course, APS.
Run one npm install at a time.
npm install express --save
npm install express-formidable --save
npm install multer --save
npm install cookie-session --save
npm install forge-apis --save
npm install autodesk.forge.designautomation --save
npm install body-parser --save
npm install form-data --save
npm install socket.io --save
The --save parameter indicates that the module should be included in the package.json file as a dependency.
Finally open the package.json and, inside "scripts", add "start": "node start.js", line. Now your folder should have a node_modules folder and your package.json should look like this
{
  "name": "designAutomationSample",
  "version": "1.0.0",
  "description": "",
  "main": "start.js",
  "scripts": {
    "start": "node start.js",
    "test": "echo \"Error: no test specified\" && exit 1"
  },
  "author": "",
  "license": "MIT",
  "dependencies": {
    "autodesk.forge.designautomation": "^3.0.3",
    "body-parser": "^1.19.0",
    "cookie-session": "^2.0.0",
    "express": "^4.17.1",
    "forge-apis": "^0.9.2",
    "form-data": "^4.0.0",
    "multer": "^1.4.5-lts.1",
    "socket.io": "^4.0.1"
  }
}
The version number (e.g. forge-apis 0.9.2) may vary, it was the latest version when this tutorial was created.
Files and Folders
To create a new folder or file, right-click on the "Explorer" area on the left and select New Folder or New File.
Create a /routes/ folder for all server-side files and a /wwwroot/ folder for all client-side files.
At this point, you project should have the following structure
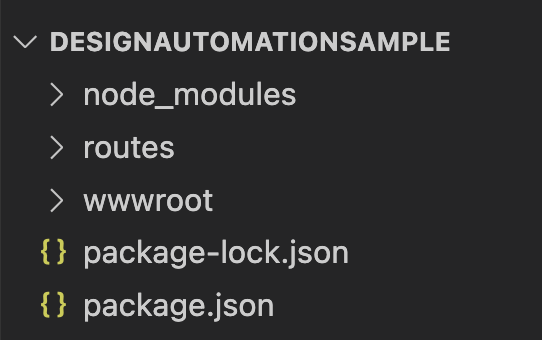
This file indicates to Visual Studio Code how we should run our project. Go to menu Run >> Add Configuration... and, in the Select Environment window that appears on the top, choose Node.js. In the /.vscode/launch.json file that is created, enter the following
{
  // Use IntelliSense to learn about possible attributes.
  // Hover to view descriptions of existing attributes.
  // For more information, visit: https://go.microsoft.com/fwlink/?linkid=830387
  "version": "0.2.0",
  "configurations": [
    {
      "type": "node",
      "request": "launch",
      "name": "Launch Program",
      "program": "${workspaceFolder}/start.js",
      "env": {
        "APS_CLIENT_ID": "your id here",
        "APS_CLIENT_SECRET": "your secret here"
      }
    }
  ]
}
It's important to define ID & Secret as environment variables so our project can later be deployed online. More on this later, in Deployment.
The *.csprojfile in your project should now look similar to this (possibly with slightly different version numbers, and additional .NET settings):
<Project Sdk="Microsoft.NET.Sdk.Web">
  <PropertyGroup>
    <TargetFramework>net6.0</TargetFramework>
    <Nullable>enable</Nullable>
    <ImplicitUsings>enable</ImplicitUsings>
  </PropertyGroup>
  <ItemGroup>
    <PackageReference Include="Autodesk.Forge" Version="1.9.7" />
    <PackageReference Include="Autodesk.Forge.DesignAutomation" Version="5.1.0" />
    <PackageReference Include="Microsoft.AspNetCore.Mvc.NewtonsoftJson" Version="6.0.11" />
    <PackageReference Include="Microsoft.AspNetCore.SignalR.Protocols.NewtonsoftJson" Version="6.0.11" />
  </ItemGroup>
</Project>
Now, when you open your project folder in Visual Studio Code for the first time, you will be prompted to setup your project for .NET development. Accept the prompt, and the editor will automatically create a .vscode subfolder with additional .NET specific settings such as the default launch configuration.
The folder structure in the editor should look similar to this.

Open launch.json from .vscode folder, set following environments in env object.
If the .vscode folder is not created automatically, you can create it via the Run & Debug sidepanel
To create the .vscode folder click on the Run and Debug tool on the left sidepanel > create a launch.json file > Select .NET5+ & .NET Core.
ASPNETCORE_URLS: use http://localhost:8080
APS_CLIENT_ID: use your id here
APS_CLIENT_SECRET: use your secret here
The launch.json should look similar to this.
{
  "version": "0.2.0",
  "configurations": [
    {
      // Use IntelliSense to find out which attributes exist for C# debugging
      // Use hover for the description of the existing attributes
      // For further information visit https://github.com/OmniSharp/omnisharp-vscode/blob/master/debugger-launchjson.md
      "name": ".NET Core Launch (web)",
      "type": "coreclr",
      "request": "launch",
      "preLaunchTask": "build",
      // If you have changed target frameworks, make sure to update the program path.
      "program": "${workspaceFolder}/bin/x64/Debug/net6.0/designAutomationSample.dll",
      "args": [],
      "cwd": "${workspaceFolder}",
      "stopAtEntry": false,
      // Enable launching a web browser when ASP.NET Core starts. For more information: https://aka.ms/VSCode-CS-LaunchJson-WebBrowser
      "serverReadyAction": {
        "action": "openExternally",
        "pattern": "\\bNow listening on:\\s+(https?://\\S+)"
      },
      "env": {
        "ASPNETCORE_ENVIRONMENT": "Development",
        "ASPNETCORE_URLS": "http://localhost:8080",
        "APS_CLIENT_ID": "Uo1RYupnCnPb2WidtW9AqGMzjN6Z41M5",
        "APS_CLIENT_SECRET": "blahblah"
      },
      "sourceFileMap": {
        "/Views": "${workspaceFolder}/Views"
      }
    },
    {
      "name": ".NET Core Attach",
      "type": "coreclr",
      "request": "attach"
    }
  ]
}
From the solution explorer, select designAutomationSample project, under the Properties,
select and open the launchSettings.json
- Change the
applicationUrlto "http://localhost:8080" - Inside the
launchSettings.jsongo toprofiles\designAutomationSample\environmentVariablesadd following environments.
ASPNETCORE_URLS:"http://localhost:8080"
APS_CLIENT_ID:"Your Id Here"
APS_CLIENT_SECRET:"Your Secret Here"
- Select
designAutomationSampleproject, right-clickAdd->New Item, selectJSON. - Name it as
appsettings.user.json. - Add following configuration settings, this is required by DesignAutomation SDK to create oAuth and run API requests.
{
  "Forge": {
    "ClientId": "your client id",
    "ClientSecret": "your secret"
  }
}
As this is running locally, sslPort is set to 0. It should look like as shown below.
{
  "iisSettings": {
    "windowsAuthentication": false,
    "anonymousAuthentication": true,
    "iisExpress": {
      "applicationUrl": "http://localhost:8080",
      "sslPort": 0
    }
  },
  "profiles": {
    "designAutomationSample": {
      "commandName": "Project",
      "dotnetRunMessages": true,
      "launchBrowser": true,
      "applicationUrl": "http://localhost:8080",
      "environmentVariables": {
        "ASPNETCORE_ENVIRONMENT": "Development",
        "APS_CLIENT_ID": "your client id here",
        "APS_CLIENT_SECRET": "your secret here"
      }
    },
    "IIS Express": {
      "commandName": "IISExpress",
      "launchBrowser": true,
      "environmentVariables": {
        "ASPNETCORE_ENVIRONMENT": "Development"
      }
    }
  }
}
Server Setup
- Node.js & VSCode
- .NET & VSCode
- .NET & VS2022
This file starts an express server. In the root folder, create a start.js file with
File names are case-sensitive for some deployments, like Heroku. For this tutorial, let's use lower-case.
const app = require("./server");
const socketIO = require("./socket.io")(app);

let server = socketIO.http.listen(app.get("port"), () => {
  console.log(`Server listening on port ${app.get("port")}`);
});

server.on("error", (err) => {
  if (err.errno === "EACCES") {
    console.error(`Port ${app.get("port")} already in use.\nExiting...`);
    process.exit(1);
  }
});
This file serves static files (e.g. html), and routes API requests. In the root folder, create a file named server.js with the following content.
const _path = require("path");
const express = require("express");
const cookieSession = require("cookie-session");
const config = require("./config");
if (!config.credentials.client_id || !config.credentials.client_secret)
  return console.error(
    "Missing APS_CLIENT_ID or APS_CLIENT_SECRET env variables."
  );

let app = express();
app.use(express.static(_path.join(__dirname, "./wwwroot")));
app.use(
  cookieSession({
    name: "aps_session",
    keys: ["aps_secure_key"],
    maxAge: 60 * 60 * 1000, // 1 hour, same as the 2 legged lifespan token
  })
);
app.use(
  express.json({
    limit: "50mb",
  })
);

app.set("port", process.env.PORT || 8080);

module.exports = app;
In the root folder, create a file named socket.io.js with the following content.
module.exports = (app) => {
  const http = require("http").Server(app);
  const io = require("socket.io")(http);
  app.io = io;

  let clients = 0;
  io.on("connection", (socket) => {
    clients++;
    console.log("a client is connected");

    // Whenever someone disconnects this piece of code executed
    socket.on("disconnect", function () {
      clients--;
      console.log("a client disconnected");
    });
  });

  return {
    http: http,
    io: io,
  };
};
In the root folder, create a file named config.js with the following content.
// Autodesk Platform Services configuration
module.exports = {
  // Set environment variables or hard-code here
  credentials: {
    client_id: process.env.APS_CLIENT_ID,
    client_secret: process.env.APS_CLIENT_SECRET,
    callback_url: process.env.APS_CALLBACK || process.env.APS_CALLBACK_URL,
  },
  scopes: {
    // Required scopes for the server-side application
    internal: [
      "bucket:create",
      "bucket:read",
      "bucket:delete",
      "data:read",
      "data:create",
      "data:write",
      "code:all",
    ],
    // Required scope for the client-side viewer
    public: ["viewables:read"],
  },
  client: {
    circuitBreaker: {
      threshold: 11,
      interval: 1200,
    },
    retry: {
      maxNumberOfRetries: 7,
      backoffDelay: 4000,
      backoffPolicy: "exponentialBackoffWithJitter",
    },
    requestTimeout: 13000,
  },
};
We are using the environment variables here. At the time of running our Express server, the values of these variables will be used to connect to APS.
Now create a common subfolder in the routes folder, and prepare a routes/common/oauth.js file that will actually request the access token from APS. This will be reused in other parts of this tutorial.
- routes/common/oauth.js
const { AuthClientTwoLegged } = require("forge-apis");
const config = require("../../config");

// Tokens are auto-refreshed, keeping clients in simple cache
let cache = {};

// Since we got 3 calls at the first page loading, let's initialize this one now,
// to avoid concurrent requests.
getClient(/*config.scopes.internal*/);

/**
 * Initializes a APS client for 2-legged authentication.
 * @param {string[]} scopes List of resource access scopes.
 * @returns {AuthClientTwoLegged} 2-legged authentication client.
 */
async function getClient(scopes) {
  scopes = scopes || config.scopes.internal;
  const key = scopes.join("+");
  if (cache[key]) return cache[key];

  try {
    const { client_id, client_secret } = config.credentials;
    let client = new AuthClientTwoLegged(
      client_id,
      client_secret,
      scopes || config.scopes.internal,
      true
    );
    let credentials = await client.authenticate();
    cache[key] = client;
    console.log(`OAuth2 client created for ${key}`);
    return client;
  } catch (ex) {
    return null;
  }
}

module.exports = {
  getClient,
};
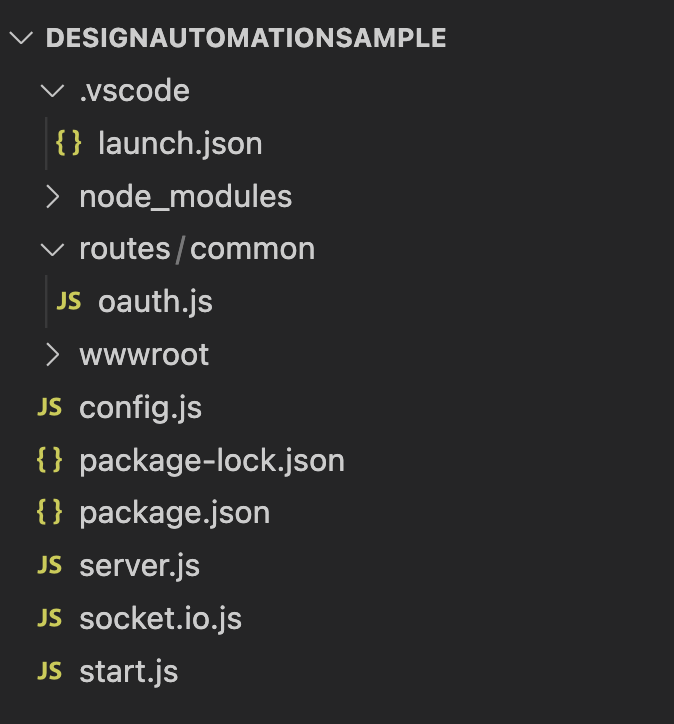
The project is ready! At this point your project should look like this
Now open the Program.cs and add the following namespaces
using Autodesk.Forge.Core;
using Autodesk.Forge.DesignAutomation;
Then replace the Program.cs content with the following. This tells our application to load Forge Client ID & Secret from the environment variables defined above.
using Autodesk.Forge.Core;
using Autodesk.Forge.DesignAutomation;
using Microsoft.AspNetCore;

namespace designAutomationSample
{
    public class Program
    {
        public static void Main(string[] args)
        {
            CreateHostBuilder(args).ConfigureAppConfiguration(builder =>
            {
                builder.AddJsonFile($"appsettings.user.json", optional: true);
                builder.AddEnvironmentVariables();

            }).ConfigureServices((hostContext, services) =>
            {
                services.AddDesignAutomation(hostContext.Configuration);
            }).Build().Run();
        }

        public static IWebHostBuilder CreateHostBuilder(string[] args) =>
            WebHost.CreateDefaultBuilder(args)
                .UseStartup<Startup>();
    }
}
Now open the Startup.cs (create it if needed) and add the following namespace
using Microsoft.AspNetCore.Mvc;
Then replace the content of the Startup class with the following code, which enables static file server (HTML & JS) and SignalR, used to push notifications to the client.
// This method gets called by the runtime. Use this method to add services to the container.
// For more information on how to configure your application, visit https://go.microsoft.com/fwlink/?LinkID=398940
public void ConfigureServices(IServiceCollection services)
{
    services.AddMvc(options => options.EnableEndpointRouting = false).SetCompatibilityVersion(CompatibilityVersion.Version_3_0).AddNewtonsoftJson();
    services.AddSignalR().AddNewtonsoftJsonProtocol(opt=> {
        opt.PayloadSerializerSettings.ReferenceLoopHandling = Newtonsoft.Json.ReferenceLoopHandling.Ignore;
    });
}

// This method gets called by the runtime. Use this method to configure the HTTP request pipeline.
public void Configure(IApplicationBuilder app, IWebHostEnvironment env)
{
    app.UseFileServer();
    app.UseMvc();
}
OAuthController.cs
Create a Controllers folder, which will host the WebAPI Controllers.
We'll need an access token to read & write input & output files to OSS Buckets. Under Controllers folder, create a OAuthController.cs file with the following content.
using System;
using System.Collections.Generic;
using System.Linq;
using System.Threading.Tasks;
using Microsoft.AspNetCore.Mvc;
using Autodesk.Forge;

namespace designAutomationSample.Controllers
{
    [ApiController]
    public class OAuthController : ControllerBase
    {
        // As both internal & public tokens are used for all visitors
        // we don't need to request a new token on every request, so let's
        // cache them using static variables. Note we still need to refresh
        // them after the expires_in time (in seconds)
        private static dynamic InternalToken { get; set; }

        /// <summary>
        /// Get access token with internal (write) scope
        /// </summary>
        public static async Task<dynamic> GetInternalAsync()
        {
            if (InternalToken == null || InternalToken.ExpiresAt < DateTime.UtcNow)
            {
                InternalToken = await Get2LeggedTokenAsync(new Scope[] { Scope.BucketCreate, Scope.BucketRead, Scope.BucketDelete, Scope.DataRead, Scope.DataWrite, Scope.DataCreate, Scope.CodeAll });
                InternalToken.ExpiresAt = DateTime.UtcNow.AddSeconds(InternalToken.expires_in);
            }

            return InternalToken;
        }

        /// <summary>
        /// Get the access token from Autodesk
        /// </summary>
        private static async Task<dynamic> Get2LeggedTokenAsync(Scope[] scopes)
        {
            TwoLeggedApi oauth = new TwoLeggedApi();
            string grantType = "client_credentials";
            dynamic bearer = await oauth.AuthenticateAsync(
              GetAppSetting("APS_CLIENT_ID"),
              GetAppSetting("APS_CLIENT_SECRET"),
              grantType,
              scopes);
            return bearer;
        }

        /// <summary>
        /// Reads appsettings from web.config
        /// </summary>
        public static string GetAppSetting(string settingKey)
        {
            return Environment.GetEnvironmentVariable(settingKey).Trim();
        }
    }
}
Project is ready! At this point it should look like

Now open the Program.cs and add the following namespaces
using Autodesk.Forge.Core;
using Autodesk.Forge.DesignAutomation;
Then replace the Program.cs content with the following. This tells our application to load Forge Client ID & Secret from the environment variables defined above.
using Autodesk.Forge.Core;
using Autodesk.Forge.DesignAutomation;
using Microsoft.AspNetCore;

namespace designAutomationSample
{
    public class Program
    {
        public static void Main(string[] args)
        {
            CreateHostBuilder(args).ConfigureAppConfiguration(builder =>
            {
                builder.AddJsonFile($"appsettings.user.json", optional: true);
                builder.AddEnvironmentVariables();

            }).ConfigureServices((hostContext, services) =>
            {
                services.AddDesignAutomation(hostContext.Configuration);
            }).Build().Run();
        }

        public static IWebHostBuilder CreateHostBuilder(string[] args) =>
            WebHost.CreateDefaultBuilder(args)
                .UseStartup<Startup>();
    }
}
Now open the Startup.cs (create it if needed) and add the following namespace
using Microsoft.AspNetCore.Mvc;
Then replace the content of the Startup class with the following code, which enables static file server (HTML & JS) and SignalR, used to push notifications to the client.
// This method gets called by the runtime. Use this method to add services to the container.
// For more information on how to configure your application, visit https://go.microsoft.com/fwlink/?LinkID=398940
public void ConfigureServices(IServiceCollection services)
{
    services.AddMvc(options => options.EnableEndpointRouting = false).SetCompatibilityVersion(CompatibilityVersion.Version_3_0).AddNewtonsoftJson();
    services.AddSignalR().AddNewtonsoftJsonProtocol(opt=> {
        opt.PayloadSerializerSettings.ReferenceLoopHandling = Newtonsoft.Json.ReferenceLoopHandling.Ignore;
    });
}

// This method gets called by the runtime. Use this method to configure the HTTP request pipeline.
public void Configure(IApplicationBuilder app, IWebHostEnvironment env)
{
    app.UseFileServer();
    app.UseMvc();
}
OAuthController.cs
Create a Controllers folder, which will host the WebAPI Controllers.
We'll need an access token to read & write input & output files to OSS Buckets. Under Controllers folder, create a OAuthController.cs file with the following content.
using System;
using System.Collections.Generic;
using System.Linq;
using System.Threading.Tasks;
using Microsoft.AspNetCore.Mvc;
using Autodesk.Forge;

namespace designAutomationSample.Controllers
{
    [ApiController]
    public class OAuthController : ControllerBase
    {
        // As both internal & public tokens are used for all visitors
        // we don't need to request a new token on every request, so let's
        // cache them using static variables. Note we still need to refresh
        // them after the expires_in time (in seconds)
        private static dynamic InternalToken { get; set; }

        /// <summary>
        /// Get access token with internal (write) scope
        /// </summary>
        public static async Task<dynamic> GetInternalAsync()
        {
            if (InternalToken == null || InternalToken.ExpiresAt < DateTime.UtcNow)
            {
                InternalToken = await Get2LeggedTokenAsync(new Scope[] { Scope.BucketCreate, Scope.BucketRead, Scope.BucketDelete, Scope.DataRead, Scope.DataWrite, Scope.DataCreate, Scope.CodeAll });
                InternalToken.ExpiresAt = DateTime.UtcNow.AddSeconds(InternalToken.expires_in);
            }

            return InternalToken;
        }

        /// <summary>
        /// Get the access token from Autodesk
        /// </summary>
        private static async Task<dynamic> Get2LeggedTokenAsync(Scope[] scopes)
        {
            TwoLeggedApi oauth = new TwoLeggedApi();
            string grantType = "client_credentials";
            dynamic bearer = await oauth.AuthenticateAsync(
              GetAppSetting("APS_CLIENT_ID"),
              GetAppSetting("APS_CLIENT_SECRET"),
              grantType,
              scopes);
            return bearer;
        }

        /// <summary>
        /// Reads appsettings from web.config
        /// </summary>
        public static string GetAppSetting(string settingKey)
        {
            return Environment.GetEnvironmentVariable(settingKey).Trim();
        }
    }
}
Project is ready! At this point it should look like