Viewer & UI
Finally, we're ready to build the client-side piece of our application.
If you're developing with Node.js, you can use TypeScript definitions for the Viewer. Run
npm install --save-dev @types/forge-viewer
in your terminal to add the TypeScript definition file to your project.
Viewer logic
Let's start by implementing the Viewer functionality for our application.
Create a viewer.js file under the wwwroot subfolder with the following code:
async function getAccessToken(callback) {
    try {
        const resp = await fetch('/api/auth/token');
        if (!resp.ok)
            throw new Error(await resp.text());
        const { access_token, expires_in } = await resp.json();
        callback(access_token, expires_in);
    } catch (err) {
        alert('Could not obtain access token. See the console for more details.');
        console.error(err);
    }
}

export function initViewer(container) {
    return new Promise(function (resolve, reject) {
            Autodesk.Viewing.Initializer({ env: 'AutodeskProduction', getAccessToken }, function () {
            const config = {
                extensions: ['Autodesk.DocumentBrowser']
            };
            const viewer = new Autodesk.Viewing.GuiViewer3D(container, config);
            viewer.start();
            viewer.setTheme('light-theme');
            resolve(viewer);
        });
    });
}

export function loadModel(viewer, urn) {
    function onDocumentLoadSuccess(doc) {
        viewer.loadDocumentNode(doc, doc.getRoot().getDefaultGeometry());
    }
    function onDocumentLoadFailure(code, message) {
        alert('Could not load model. See console for more details.');
        console.error(message);
    }
    Autodesk.Viewing.Document.load('urn:' + urn, onDocumentLoadSuccess, onDocumentLoadFailure);
}
The script is an ES6 module that exports two functions:
initViewerwill create a new instance of the viewer in the specified DOM containerloadModelfor loading a specific model to the viewer
Sidebar logic
Next we'll implement the behavior of a sidebar where we're going to display
all the hubs, projects, folders, items, and versions in a 3rd party tree-view component.
Create a sidebar.js file under the wwwroot subfolder with the following code:
async function getJSON(url) {
    const resp = await fetch(url);
    if (!resp.ok) {
        alert('Could not load tree data. See console for more details.');
        console.error(await resp.text());
        return [];
    }
    return resp.json();
}

function createTreeNode(id, text, icon, children = false) {
    return { id, text, children, itree: { icon } };
}

async function getHubs() {
    const hubs = await getJSON('/api/hubs');
    return hubs.map(hub => createTreeNode(`hub|${hub.id}`, hub.name, 'icon-hub', true));
}

async function getProjects(hubId) {
    const projects = await getJSON(`/api/hubs/${hubId}/projects`);
    return projects.map(project => createTreeNode(`project|${hubId}|${project.id}`, project.name, 'icon-project', true));
}

async function getContents(hubId, projectId, folderId = null) {
    const contents = await getJSON(`/api/hubs/${hubId}/projects/${projectId}/contents` + (folderId ? `?folder_id=${folderId}` : ''));
    return contents.map(item => {
        if (item.folder) {
            return createTreeNode(`folder|${hubId}|${projectId}|${item.id}`, item.name, 'icon-my-folder', true);
        } else {
            return createTreeNode(`item|${hubId}|${projectId}|${item.id}`, item.name, 'icon-item', true);
        }
    });
}

async function getVersions(hubId, projectId, itemId) {
    const versions = await getJSON(`/api/hubs/${hubId}/projects/${projectId}/contents/${itemId}/versions`);
    return versions.map(version => createTreeNode(`version|${version.id}`, version.name, 'icon-version'));
}

export function initTree(selector, onSelectionChanged) {
    // See http://inspire-tree.com
    const tree = new InspireTree({
        data: function (node) {
            if (!node || !node.id) {
                return getHubs();
            } else {
                const tokens = node.id.split('|');
                switch (tokens[0]) {
                    case 'hub': return getProjects(tokens[1]);
                    case 'project': return getContents(tokens[1], tokens[2]);
                    case 'folder': return getContents(tokens[1], tokens[2], tokens[3]);
                    case 'item': return getVersions(tokens[1], tokens[2], tokens[3]);
                    default: return [];
                }
            }
        }
    });
    tree.on('node.click', function (event, node) {
        event.preventTreeDefault();
        const tokens = node.id.split('|');
        if (tokens[0] === 'version') {
            onSelectionChanged(tokens[1]);
        }
    });
    return new InspireTreeDOM(tree, { target: selector });
}
Application logic
Now let's wire all the UI components together. Create a main.js file under
the wwwroot folder, and populate it with the following code:
import { initViewer, loadModel } from './viewer.js';
import { initTree } from './sidebar.js';

const login = document.getElementById('login');
try {
    const resp = await fetch('/api/auth/profile');
    if (resp.ok) {
        const user = await resp.json();
        login.innerText = `Logout (${user.name})`;
        login.onclick = () => {
            const iframe = document.createElement('iframe');
            iframe.style.visibility = 'hidden';
            iframe.src = 'https://accounts.autodesk.com/Authentication/LogOut';
            document.body.appendChild(iframe);
            iframe.onload = () => {
                window.location.replace('/api/auth/logout');
                document.body.removeChild(iframe);
            };
        }
        const viewer = await initViewer(document.getElementById('preview'));
        initTree('#tree', (id) => loadModel(viewer, window.btoa(id).replace(/=/g, '')));
    } else {
        login.innerText = 'Login';
        login.onclick = () => window.location.replace('/api/auth/login');
    }
    login.style.visibility = 'visible';
} catch (err) {
    alert('Could not initialize the application. See console for more details.');
    console.error(err);
}
The script will first try and obtain user details to check whether we're logged in or not.
If we are, the code can then initialize the viewer as well as the tree-view component.
The callback function passed to initTree makes sure that when we click on a leaf node
in the tree, the viewer will start loading the corresponding model.
User interface
And finally, let's build the UI of our application.
Create a main.css file under the wwwroot subfolder, and populate it with the following CSS rules:
body, html {
    margin: 0;
    padding: 0;
    height: 100vh;
    font-family: ArtifaktElement;
}

#header, #sidebar, #preview {
    position: absolute;
}

#header {
    height: 3em;
    width: 100%;
    display: flex;
    flex-flow: row nowrap;
    justify-content: space-between;
    align-items: center;
}

#sidebar {
    width: 25%;
    left: 0;
    top: 3em;
    bottom: 0;
    overflow-y: scroll;
}

#preview {
    width: 75%;
    right: 0;
    top: 3em;
    bottom: 0;
}

#header > * {
    height: 2em;
    margin: 0 0.5em;
}

#login {
    font-family: ArtifaktElement;
    font-size: 1em;
}

#header .title {
    height: auto;
    margin-right: auto;
}

#tree {
    margin: 0.5em;
}

@media (max-width: 768px) {
    #sidebar {
        width: 100%;
        top: 3em;
        bottom: 75%;
    }
    #preview {
        width: 100%;
        top: 25%;
        bottom: 0;
    }
}

.icon-hub:before {
    background-image: url(https://raw.githubusercontent.com/primer/octicons/main/icons/apps-16.svg); /* or https://raw.githubusercontent.com/primer/octicons/main/icons/stack-16.svg */
    background-size: cover;
}

.icon-project:before {

    background-image: url(https://raw.githubusercontent.com/primer/octicons/main/icons/project-16.svg); /* or https://raw.githubusercontent.com/primer/octicons/main/icons/organization-16.svg */
    background-size: cover;
}

.icon-my-folder:before {
    background-image: url(https://raw.githubusercontent.com/primer/octicons/main/icons/file-directory-16.svg);
    background-size: cover;
}

.icon-item:before {
    background-image: url(https://raw.githubusercontent.com/primer/octicons/main/icons/file-16.svg);
    background-size: cover;
}

.icon-version:before {
    background-image: url(https://raw.githubusercontent.com/primer/octicons/main/icons/clock-16.svg);
    background-size: cover;
}
Then, create an index.html file in the same folder with the following content:
<!doctype html>
<html lang="en">

<head>
    <meta charset="utf-8">
    <meta name="viewport" content="width=device-width, initial-scale=1">
    <link rel="icon" type="image/x-icon" href="https://cdn.autodesk.io/favicon.ico">
    <link rel="stylesheet" href="https://developer.api.autodesk.com/modelderivative/v2/viewers/7.*/style.css">
    <link rel="stylesheet" href="https://unpkg.com/inspire-tree-dom@4.0.6/dist/inspire-tree-light.min.css">
    <link rel="stylesheet" href="/main.css">

    <title>Autodesk Platform Services: Hubs Browser</title>
</head>

<body>
    <div id="header">
        <img class="logo" src="https://cdn.autodesk.io/logo/black/stacked.png" alt="Autodesk Platform Services">
        <span class="title">Hubs Browser</span>
        <button id="login" style="visibility: hidden;">Login</button>
    </div>
    <div id="sidebar">
        <div id="tree"></div>
    </div>
    <div id="preview"></div>
    <script src="https://developer.api.autodesk.com/modelderivative/v2/viewers/7.*/viewer3D.js"></script>
    <script src="https://cdnjs.cloudflare.com/ajax/libs/lodash.js/4.17.21/lodash.min.js"></script>
    <script src="https://unpkg.com/inspire-tree@4.3.1/dist/inspire-tree.js"></script>
    <script src="https://unpkg.com/inspire-tree-dom@4.0.6/dist/inspire-tree-dom.min.js"></script>
    <script src="/main.js" type="module"></script>
</body>

</html>
Note that since
main.jsis also an ES6 module, we have to usetype="module"in its<script>tag.
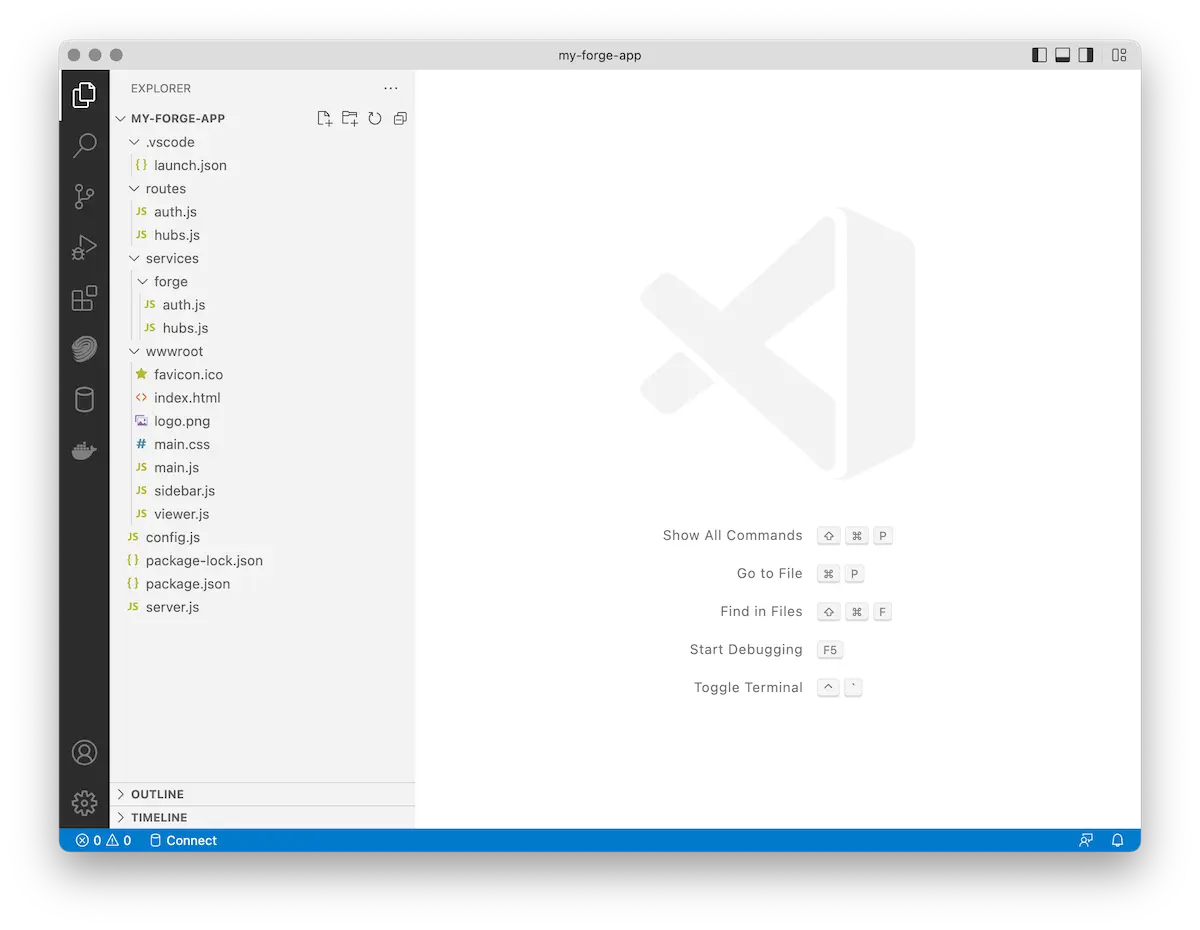
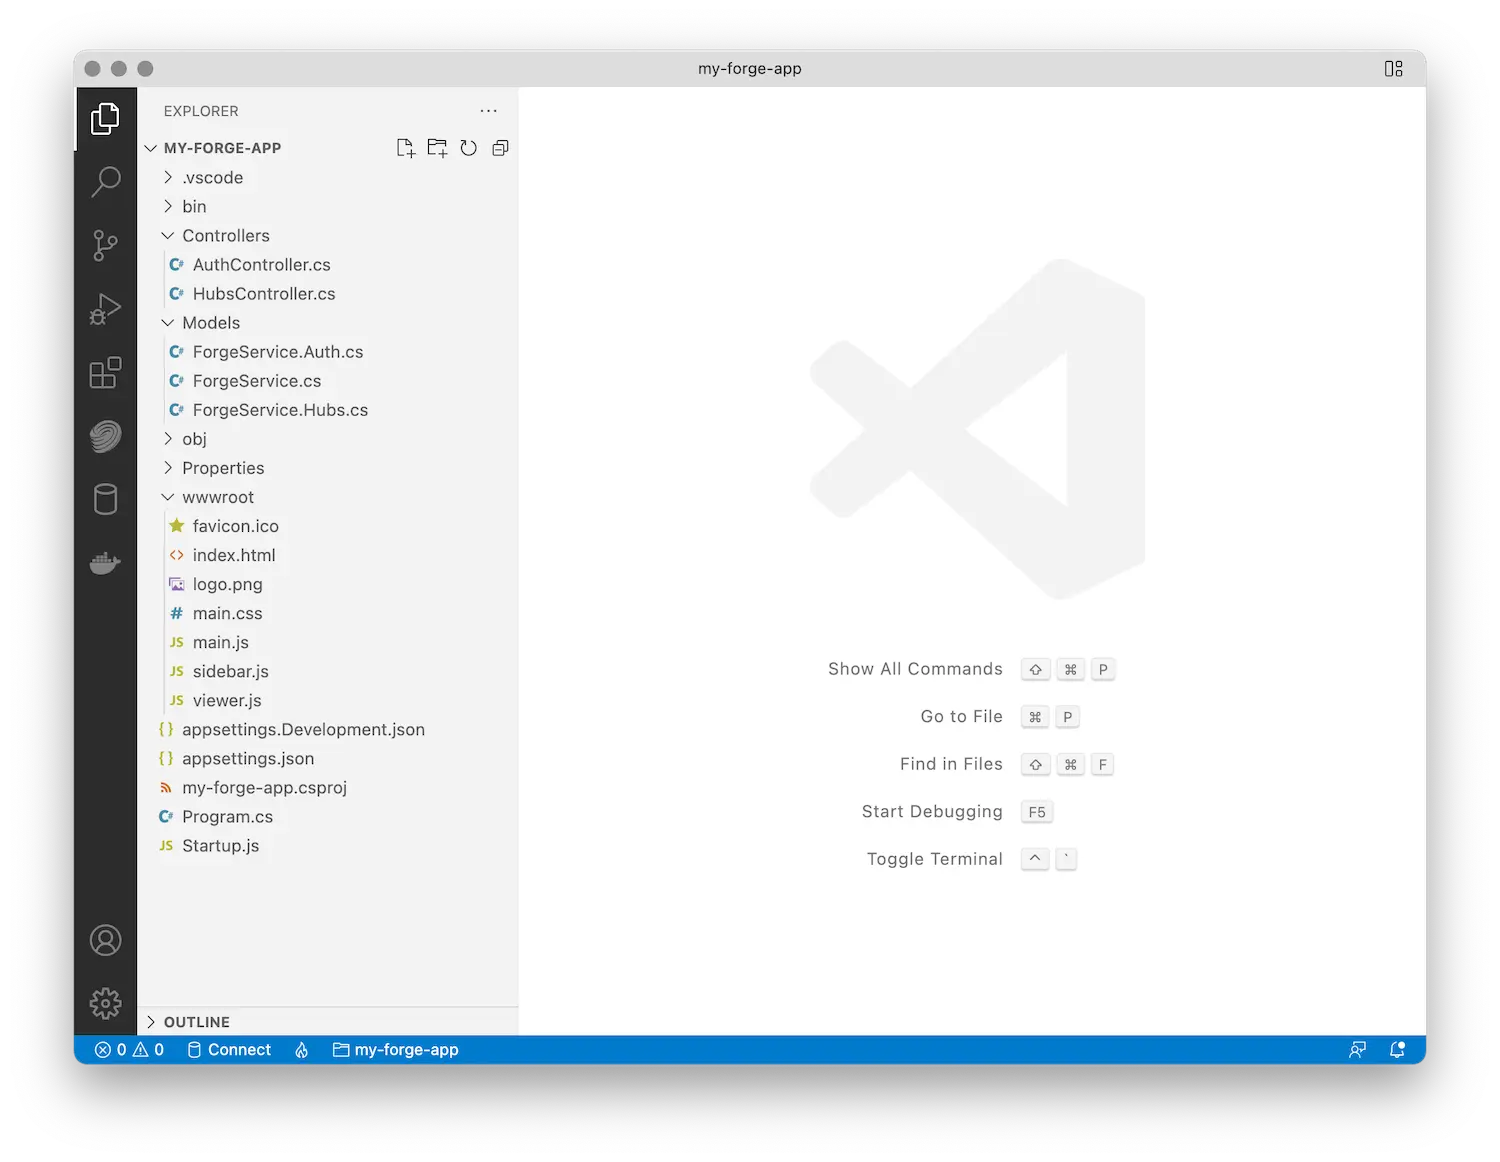
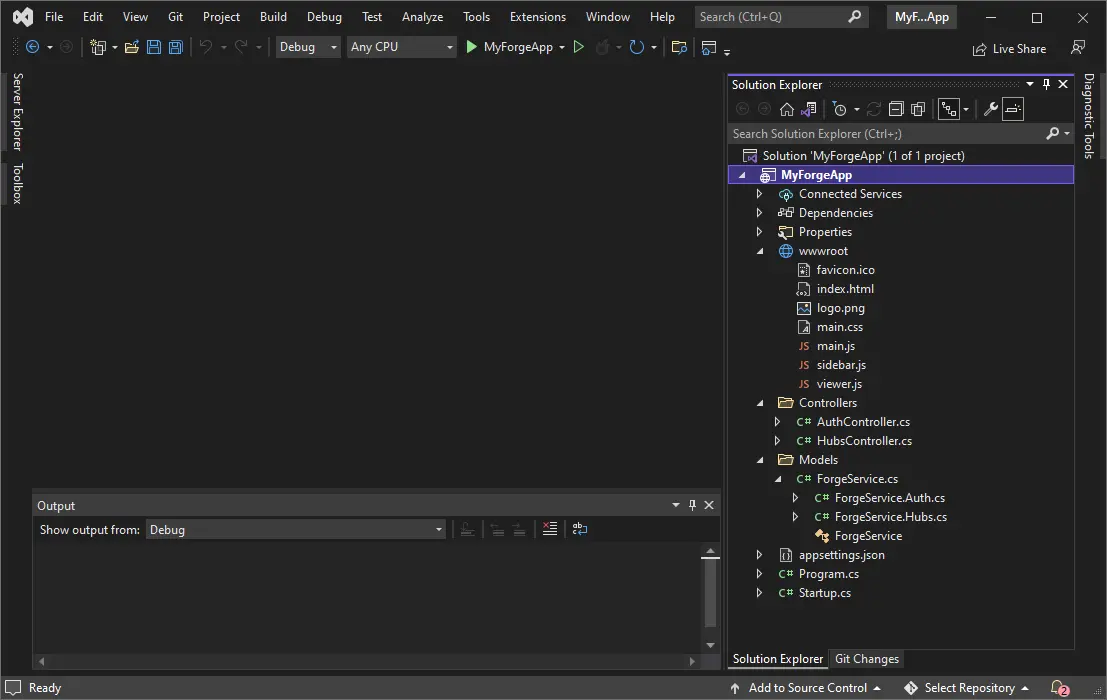
The final folder structure of your application's source code should now look something like this:
- Node.js & VSCode
- .NET & VSCode
- .NET & VS2022


Try it out
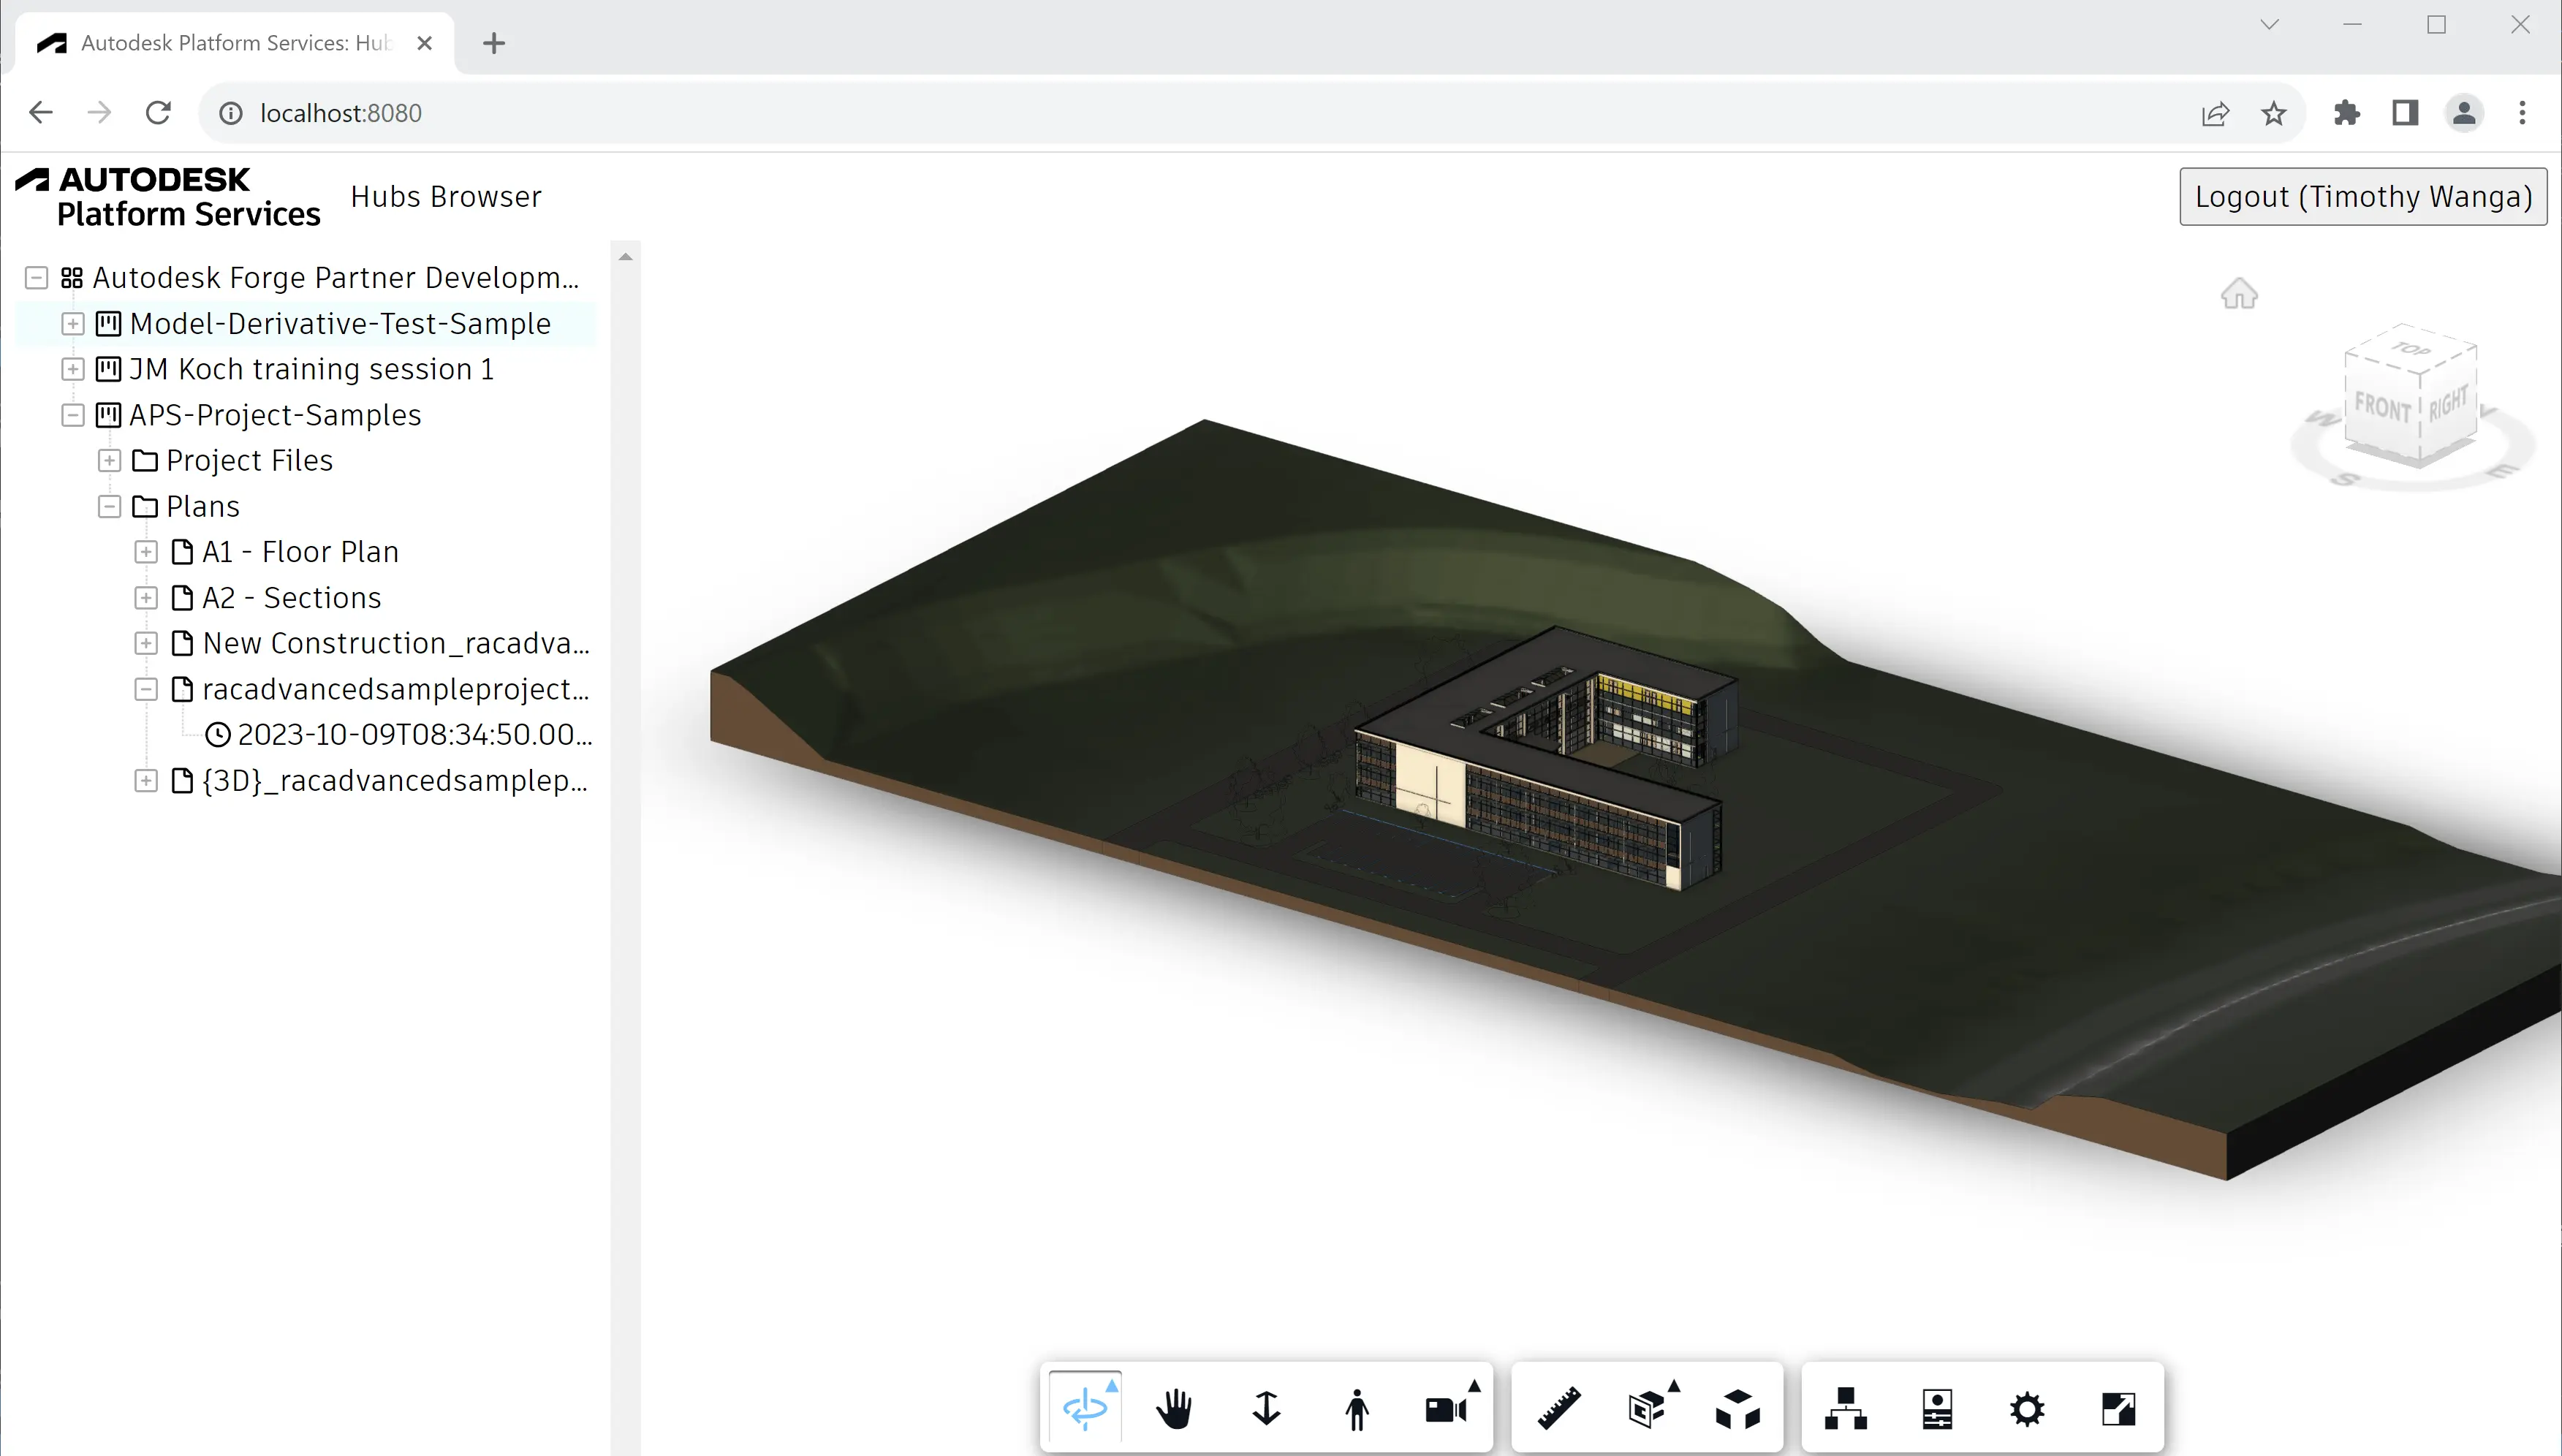
And that's it! Your application is now ready for action. Start it as usual, and when you go to http://localhost:8080, you should be presented with a simple UI, with a tree-view on the left side, and an empty viewer on the right. Try browsing through the tree, and select a specific version of one of your files. After that the corresponding model should be loaded into the viewer.
Please note that designs uploaded to Fusion Teams are not processed for viewing automatically. You'll want to open these designs on the Fusion Teams website first, and when they're ready, you can view them in your own Hubs Browser application.
